This page describes how to integrate a Chromecast device with DAS. Any intermediary gateways or proxies have been omitted for simplicity.
The sample application shows how the sender/receiver work in the context of Chromecast, in conjunction with calls to the DAS service on the SSP backend.
Application registration
The first step is to register the application.
-
The registration process requires a Gmail account and currently costs $5 (US).
-
A complete description is available on Google's official registration page.
Once registered, on the SDK console page, click Add New Application.
-
You must provide the details of the application, such as its name, URL (the page that will be displayed on casting), etc.
-
Once you have saved this page, the details will be visible on the dashboard.
To test the application, the device must be registered.
-
Click Add New Device on the Google Cast SDK Development Console and follow through.
-
Keep the serial number of the device handy.
Chromecast library integration
Throughout this page, das_sender.js acts as the sender, and dasWebClient.js acts as the receiver. Your application must reference some Google-provided Chromecast libraries.
Javascript Chromecast libraries
-
Sender (referenced by das_sender.js):
JavaScript<script src="https://www.gstatic.com/cv/js/sender/v1/cast_sender.js?loadCastFramework=1"></script> -
Receiver (referenced by dasWebClient.js):
JavaScript<script type="text/javascript" src="//www.gstatic.com/cast/sdk/libs/caf_receiver/v3/cast_receiver_framework.js"></script>
Minimal code
The following code snippets provide the minimum functionality required on both ends (sender/receiver).
-
The following snippet (found in das_sender.js) is for cast API initialization.
JavaScriptwindow['__onGCastApiAvailable'] = function(isAvailable) { if (isAvailable) { initializeCastApi(); } } initializeCastApi = function() { cast.framework.CastContext.getInstance().setOptions({ receiverApplicationId: "8898F99A", //Registered application's id autoJoinPolicy: chrome.cast.AutoJoinPolicy.ORIGIN_SCOPED }); }; -
The following snippet (found in das_sender.js) is to send data to the Chromecast receiver.
JavaScriptfunction sendMessage(elementId, message){ const CUSTOM_CHANNEL = 'urn:x-cast:com.nagra.dasweb'; // NAMESPACE can be any string starting with "urn:x-cast:" that acts as a channel to can send and receive information on. var castSession = cast.framework.CastContext.getInstance().getCurrentSession(); if(castSession){ castSession.sendMessage(CUSTOM_CHANNEL, { id: elementId, text: message }); } } -
The following snippet (found in dasWebClient.js) is to start the receiver.
JavaScriptconst CUSTOM_CHANNEL = 'urn:x-cast:com.nagra.dasweb'; const context = cast.framework.CastReceiverContext.getInstance(); context.addCustomMessageListener(CUSTOM_CHANNEL, function(customEvent) { // application specific code }); context.start();
Reference das-web-client app details
NAGRA's reference Chromecast DAS client app includes the different files
|
File |
Link to Example |
Notes |
|---|---|---|
|
sender.html |
sample_application/chromecast/sender.html |
The HTML page to be cast. This page has three input fields: auth token, opvault_url and base_url; the values used for the DAS Web SDK client can be used for these.
|
|
das_sender.js |
sample_application/chromecast/das_sender.js |
The JS contains the cast API initialization and |
|
dasWebClient.html |
sample_application/chromecast/dasWebClient.html |
The HTML page that loads in the Chromecast device. |
|
dasWebClient.js |
sample_application/dasWebClient.js |
The JS contains the code that starts the receiver and listens to the sender's incoming messages. |
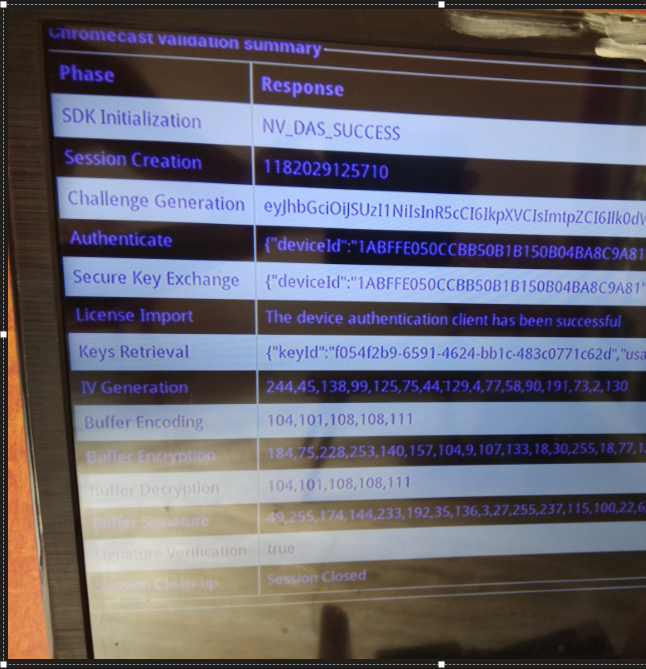
Validation
-
Cast the sender web page from the browser to the TV. Observe that our receiver/application name is displayed on the Cast pop-up.

-
Once the application loads and is visible on the TV screen, the application will wait for the sender's input parameters (auth token, base url and opvault_url).
-
Whenever the application receives an input parameter from the sender, it will display the appropriate message (depending on the parameter received).

-
Once the application receives all the expected parameters, the core functionality is triggered. The responses for each phase are displayed on-screen.